When working with large datasets in web applications, efficient data management becomes essential. One of the most useful features in jQuery DataTables is row selection and the “Select All” option, which allows users to quickly select multiple rows across pages. In this blog, we’ll explore how to implement row selection and “Select All” functionality in DataTables, ensuring it works seamlessly with pagination and filters.
This blog walks you through creating a DataTable with row selection capabilities, handling the ‘Select All’ checkbox, and ensuring proper selection of rows not visible due to pagination or filtering.
We’ll cover the problem, the solution, and the reasoning behind each step.
Why Implementing Row Selection and ‘Select All’ in jQuery DataTables is Challenging
jQuery DataTables makes it easy to display and interact with data, but managing rows that aren’t visible on the current page can be challenging.
This is especially important if you’re dealing with large datasets where pagination and filtering are necessary
Here are some of the common issues:
- Non-visible rows: The DOM only renders the rows that are currently visible. This means if you try to use regular DOM methods to interact with non-visible rows (like selecting or deselecting them), you won’t be able to do so directly.
- Multiple pages: DataTables will only render one page of data at a time. If your table spans multiple pages, selecting rows across these pages can be challenging.
- Filters: When you apply filters, the table only shows rows that match the filter, which means any selections made before filtering might be lost.
The Scenario
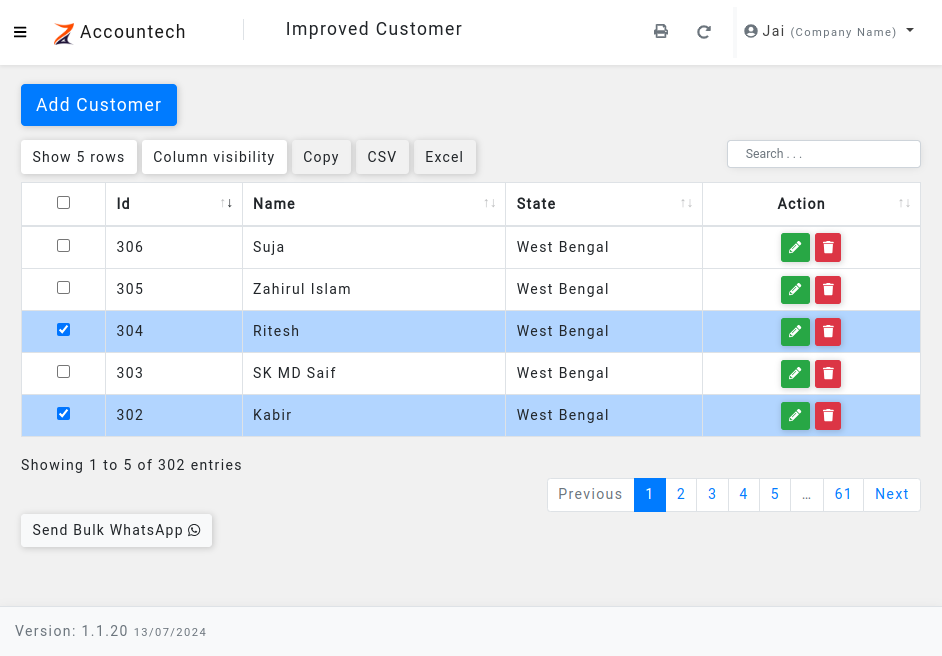
Let’s assume we have a customer management system where we want to display customer details in a paginated table. The user should be able to select individual rows, and a “Select All” checkbox should allow them to select all rows, even those that are not currently visible due to pagination or filtering.
The Table
We have a table with the following columns:
- Customer ID
- Name
- GSTIN (Tax ID)
- Address
- Mobile Number
- State
- Action buttons (Edit, Delete)
The first column contains checkboxes for selecting rows, and a “Select All” checkbox in the header allows the user to select all rows at once.
The Challenge
The main challenge is ensuring that the “Select All” checkbox works properly across multiple pages and filters. For example, if a user selects all rows on page 1, goes to page 2, and selects more rows, the selections should be saved. Similarly, if the user applies a filter and then selects rows, the selection should include both filtered and non-filtered rows.
Let’s now dive into the solution.
Setting Up the DataTable
We’ll start by initializing the DataTable with AJAX data and defining columns. We’ll also include the first column with checkboxes for row selection.
const customer_view_modal = $("#customer_view_modal").DataTable({
    ajax: {
        url: "/api/customers/improved-customer",
    },
    dom: "Bfrtip",
    buttons: ["pageLength", "colvis", "copy", "csv", "excel"],
    columns: [
        {
            sorting: false,
            ordering: false,
            orderable: false,
            title: `<input type="checkbox" class="select_customer_table_select_all" data-toggle="tooltip" data-title="Select All">`,
            visible: false,
            className: "text-center",
            data: {
                _: "id",
                display({ name }) {
                    return `<input type="checkbox" class="select_customer_table_row" data-toggle="tooltip" data-title="${name}">`;
                }
            },
        },
        {
            title: "Id",
            data: "id"
        },
        {
            title: "Name",
            data: "name"
        },
        {
            title: "GSTIN",
            data: "gstin"
        },
        {
            title: "Address",
            data: "address",
            visible: false,
        },
        {
            visible: false,
            title: "Mobile",
            data: "mobile"
        },
        {
            visible: false,
            title: "Email",
            data: "email"
        },
        {
            visible: false,
            title: "State",
            data: "state_name"
        },
        {
            title: "Action",
            className: "text-center",
            data: {
                _: "id",
                display() {
                    return `<button class="btn btn-success btn-sm edit_item"><i class="fa fa-pencil-alt"></i></button>
                            <button class="btn btn-danger btn-sm delete_item"><i class="fa fa-trash"></i></button>`;
                }
            }
        },
    ],
    rowCallback(row, data) {
        if (data.isSelected) {
            $(row).find(".select_customer_table_row").prop("checked", true);
            $(row).addClass("selected");
        } else {
            $(row).find(".select_customer_table_row").prop("checked", false);
            $(row).removeClass("selected");
        }
    }
});
In this setup, the rowCallback function is used to ensure that each row’s checkbox reflects the correct selection state based on a custom isSelected property in the data.
Row Selection and ‘Select All’ in DataTables:
1. Handling Row Selection
Next, we handle individual row selection. When a user clicks a checkbox to select or deselect a row, we update the isSelected property in the row’s data, and modify the DOM accordingly.
$("body").on("change", "#customer_view_modal .select_customer_table_row", function () {
    const rowData = customer_view_modal.row($(this).parents("tr")).data();
    if ($(this).is(":checked")) {
        rowData.isSelected = true;
        $(this).parents("tr").addClass("selected");
    } else {
        rowData.isSelected = false;
        $(this).parents("tr").removeClass("selected");
        $(".select_customer_table_select_all").prop("checked", false);
    }
});
Here, we update the isSelected property of the row’s data when the checkbox state changes, ensuring that the selection state is preserved even when the row is not currently visible in the DOM.
2. Implementing the “Select All” Checkbox
The “Select All” functionality is where the real challenge lies. We need to make sure that clicking the ‘Select All’ checkbox selects all rows, whether they are visible or not.
$("body").on("change", "#customer_view_modal .select_customer_table_select_all", function (e) {
    e.preventDefault();
    e.stopPropagation();
    const isChecked = $(this).is(":checked");

    if (isChecked) {
        const rows = customer_view_modal.rows({ filter: "applied" });
        const nodes = customer_view_modal.rows().nodes();

        rows.every(function () {
            const data = this.data();
            data.isSelected = true;
        });

        $(nodes).find(".select_customer_table_row").prop("checked", true);
        $(nodes).addClass("selected");
    } else {
        const rows = customer_view_modal.rows();
        const selected_nodes = customer_view_modal.rows(".selected").nodes();

        rows.every(function () {
            const data = this.data();
            data.isSelected = false;
        });

        $(selected_nodes).find(".select_customer_table_row").prop("checked", false);
        $(selected_nodes).removeClass("selected");
    }
});
Explanation for Row Selection and ‘Select All’ in DataTables:
- Handling Visible Rows: We use
customer_view_modal.rows({ filter: "applied" })to get the rows that are currently visible and apply the selection. - Handling All Rows: Whether visible or not, we update the
isSelectedproperty for all rows usingrows.every(), ensuring the selection state is stored in the data. - DOM Updates: We update the DOM only for the currently visible rows using
rows().nodes().
Retrieving Selected Rows
Finally, let’s retrieve the selected rows when the user clicks a button (e.g., to send a WhatsApp message).
$("#sendWhatsApp").on("click", function () {
    const tableData = customer_view_modal.data().toArray();
    const selected_rows = tableData.filter(obj => obj.isSelected);
    console.log(selected_rows);
});
This will provide an array of all selected rows, including those that aren’t currently visible.
Conclusion
Handling row selection and the ‘Select All’ functionality in jQuery DataTables can be challenging, especially with paginated and filtered data.
However, with the right approach, it becomes manageable.
By using DataTables’ internal data structure and APIs, you can correctly manage both visible and non-visible rows.
This ensures that selection states remain intact across pagination and filters.
This method allows for seamless user interaction, even in large datasets, while keeping the DOM manipulation efficient and lightweight.
Happy coding!


