How to Check Ubuntu Version: 4 Easy Ways (GUI & Terminal)
Need to check ubuntu version? Here is a step-by-step guide on how to check ubuntu version using both Command Line and Graphical Interface. Perfect for beginners and pros.

Sariful Islam

You are likely staring at your screen, wondering which version of Ubuntu you are actually running. Maybe you need to install a specific software package that requires a minimum OS version, or perhaps you are just troubleshooting an issue and the support forums are asking for your release details.
It is a frustrating pause in your workflow. You want to install that new tool or fix that bug, but first, you have to dig around for system information.
The good news is that finding this information is incredibly fast. Whether you prefer clicking through a visual interface or typing quick commands, you can check ubuntu version in seconds. In this guide, I will show you exactly how to check ubuntu version using four simple methods that I use daily at Zubizi Web Solutions.
Method 1: Check Ubuntu Version via Graphical User Interface (GUI)
If you are using the standard Ubuntu desktop, this is the most intuitive way to find your version details. You do not need to memorise any commands or open a terminal. It is just like checking “About This Mac” on Apple computers or “System Properties” on Windows.
Follow these steps:
- Open Settings: Click on the system menu in the top-right corner of your screen (where the battery and sound icons are) and select Settings. Alternatively, press the Super key (Windows key) and type “Settings”.
- Navigate to About: In the Settings window- scroll down the left-hand sidebar to System > About.
- View Details: Look at the “Operating System” field.
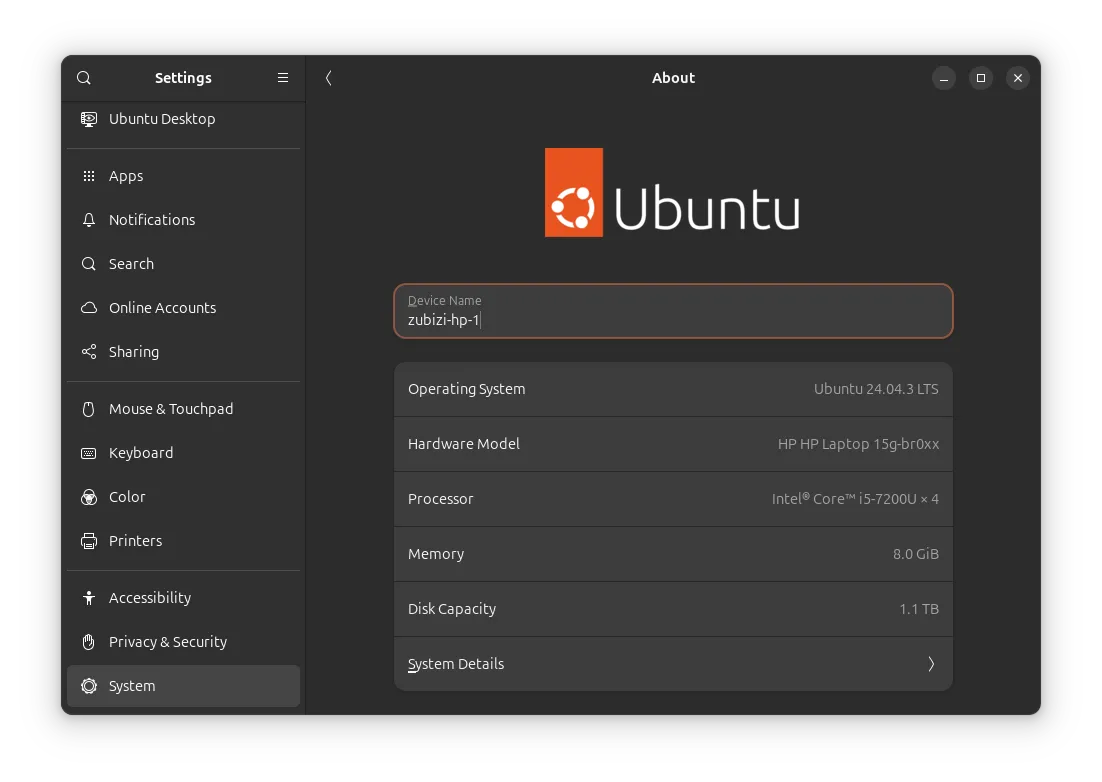
This screen gives you a complete overview. You will see not just the version (like Ubuntu 24.04 LTS) but also your OS Type (usually 64-bit), GNOME version, and windowing system (Wayland or X11).
When to use this method?
Use this when you are already in the desktop environment and need a quick, visual confirmation. It is perfect for beginners who are not yet comfortable with the command line.
Method 2: Use the lsb_release Command (Terminal)
For those of us who live in the terminal - or if you are managing a server via SSH - the GUI is not an option. The standard command for checking distribution information is lsb_release. It is clean, specific, and standard across many Linux distributions.
Here is how to do it:
- Open your terminal (
Ctrl + Alt + T). - Type the following command and hit Enter:
lsb_release -a
What you will see:
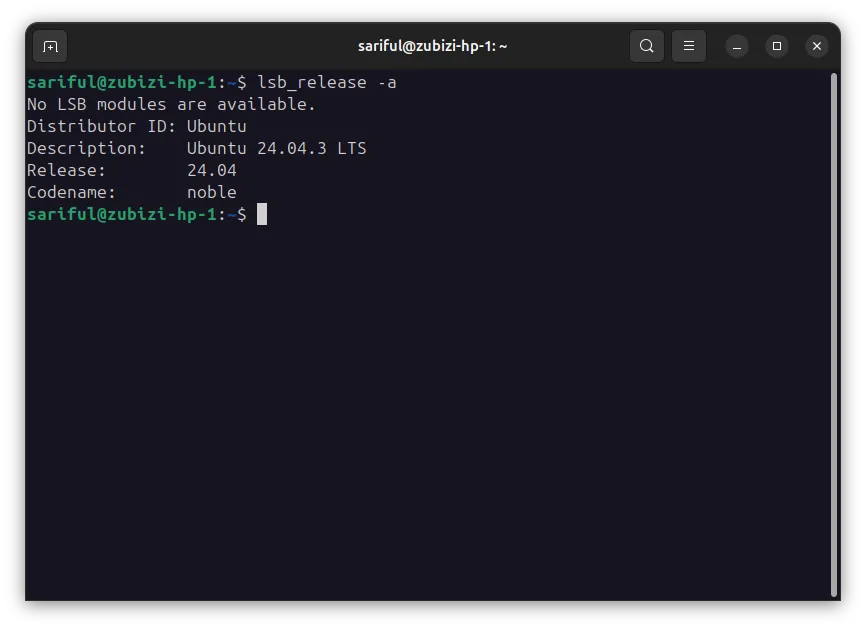
The output is very readable:
- Distributor ID: Ubuntu
- Description: Ubuntu 24.04 LTS (This is the friendly name)
- Release: 24.04 (This is the version number)
- Codename: noble (This is the internal development name, e.g., Noble Numbat)
Understanding the “Codename” is crucial when you are editing your sources.list file or adding PPA repositories, as many repositories are organized by these names.
Method 3: Read the /etc/os-release File
Sometimes, you might be on a minimal system where lsb_release is not installed. In that case, reading the os-release file is a foolproof method. This file contains operating system identification data and is present on almost every modern Linux system.
Execute this command:
cat /etc/os-releaseThe Output:
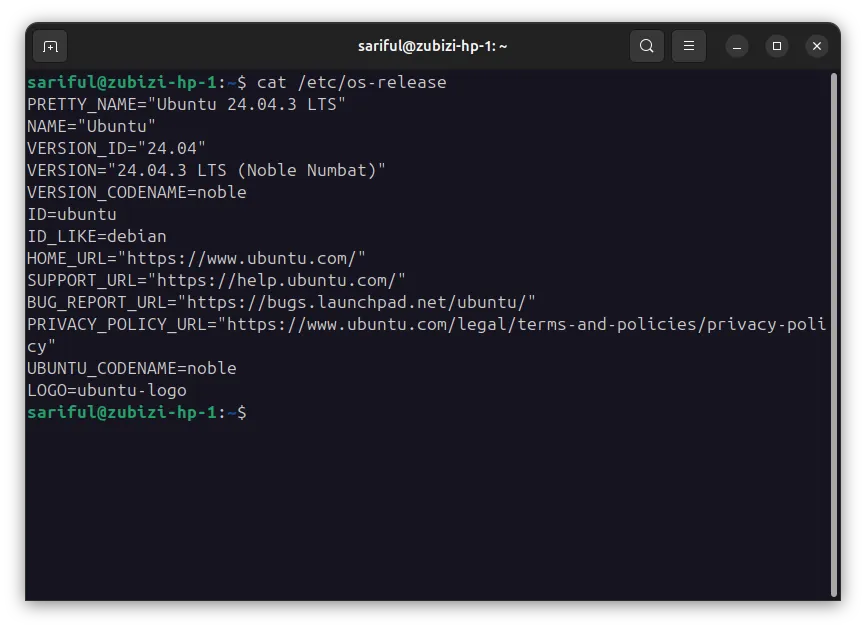
This gives you raw variables. It is excellent for scripting because you can easily parse these values.
PRETTY_NAMEgives you the full display name.VERSION_IDgives you the exact number to check against requirements.
Pro Tip: If you only want the version number, you can combine tools like grep to filter this:
grep '^VERSION=' /etc/os-releaseMethod 4: Use hostnamectl
The hostnamectl command is primarily used to change the system hostname, but it also provides a fantastic summary of the system status, including the kernel and OS version. This is my go-to command when logging into a new server because it gives me the “big picture” immediately.
Run this command:
hostnamectlWhat to look for:
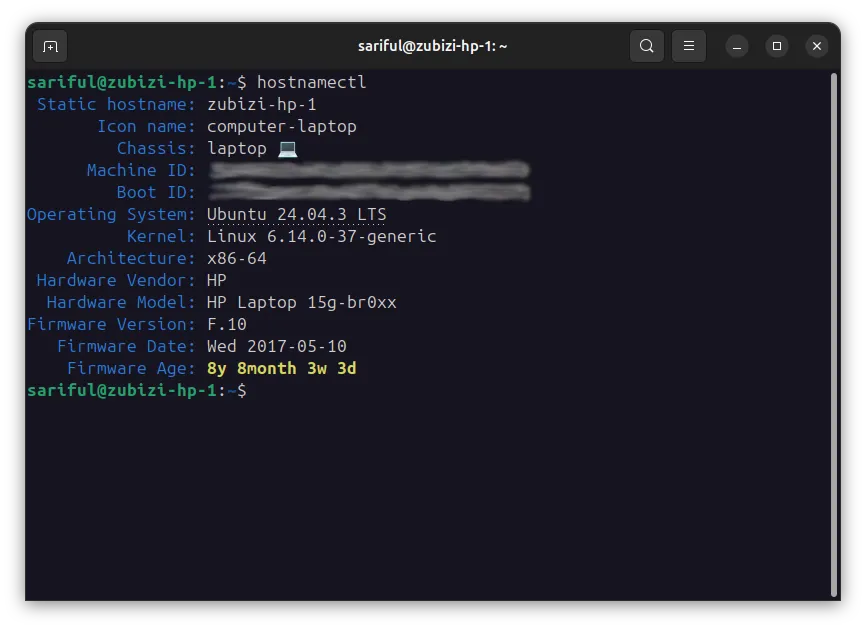
Look for the line starting with Operating System. It clearly displays “Ubuntu 24.04 LTS” alongside other vital stats like your Kernel version and Architecture (x86-64).
Why checking the Kernel matters too
Often when you need to check ubuntu version, knowing your Kernel version is just as important. For example, some hardware drivers strictly require a newer Kernel (like 6.5+) even if you are on an older Ubuntu release. hostnamectl gives you both pieces of information in one shot.
Comparison of Methods
| Method | Best For | Pros | Cons |
|---|---|---|---|
| GUI Settings | Beginners / Desktop Users | Visual, easy to read, shows hardware info | Requires desktop environment |
| lsb_release | Terminal Users | Standard format, clean output | Might need installation on minimal systems |
| cat /etc/os-release | Scripts / Automation | Universal availability, parsable | Output is raw text variables |
| hostnamectl | System Admins | Shows Kernel & Architecture too | More info than just OS version |
Conclusion
Knowing how to check ubuntu version is a fundamental skill for any Linux user. Whether you are running a high-powered workstation or a simple VPS for your Indian SME’s website, being able to quickly verify your environment is essential for maintenance and troubleshooting.
I recommend sticking to lsb_release -a for general daily use in the terminal as it is the most readable. If you are just browsing your desktop, the Settings panel is perfectly fine.
Key Takeaway: You do not need to be a wizard to find your system info. Just one command or click is all it takes to clear up the confusion and get back to work.